
Homemade No-Cook Ice Cream Recipe for the Whole Family

Who can resist some cold homemade no-cook ice cream on a hot summer day?
Ready to whip up some homemade no-cook ice cream? Nothing beats the feeling of crafting a creamy, dreamy treat right in your kitchen without relying on fancy equipment. Whether you're a vanilla purist or a flavor experimenter, this recipe with simple ingredients makes it super easy to customize your scoop. Plus, it's a smooth ride from mixing to munching, no stress involved. Let's get you set up with the basics and some cool tricks to make your ice cream game strong with this easy vanilla ice cream recipe.
Homemade no-cook ice cream is super easy to whip up in any ice cream maker. This 6-quart recipe is perfect for the hustle and bustle of summer. The no-cook option doesn't include raw egg yolks so you don't have to cook it prior to churning. All you do is mix, dump, churn, and enjoy!
In this post, I'm going to share with you:
- This recipe for homemade no-cook ice cream that my family loves.
- How to make ice cream at home using easy homemade ice cream recipes, like this one.
- My opinion of the "best ice cream toppings" - Believe me, the list is long.
- The best tools for making ice cream, starting with a good ice cream maker (0r without).
This post contains Affiliate Links. This means if you click and buy, I might make a commission at no cost to you.
See my policy for more information
A 6-quart wood slow-churn electric ice cream maker is used to churn our homemade no-cook ice cream. Matt's great aunt had the ice cream maker. We inherited it from her. She loved to make her own ice cream using a homemade ice cream recipe. It's nice to be able to use her ice cream maker while we reminisce of memories from her life with us.
But keep in mind that since this recipe is eggless, you can easily make homemade ice cream in a bag or with a blender or in a can.
Great memories are made while sitting around an ice cream churn. Whether it's electrical or hand cranked, everyone remembers the delicious taste of homemade no-cook ice cream. Keep in mind this recipe is a homemade vanilla ice cream recipe and the ice cream base can be used to create masterpieces! Here's how to make it.
What You Need
- Ice Cream Maker - If you're using a 6 Quart like me, you're good to go. But if your ice cream maker is smaller, plan accordingly for the amount of ingredients you use.
- Rock Salt
- PLENTY of Ice - 3-5 Bags
- Large Mixing Bowl
- Spatula
- Freezer-Safe Container
- Ice Cream Ingredients, according to this recipe.
Homemade Ice Cream Ingredients
8 Cups Whole Milk
8 Cups Heavy Whipping Cream
3 Cups White Sugar
4 TBSP Vanilla Extract
4 Pinches of Salt
Keep reading for optional flavor choices.
How to Make It
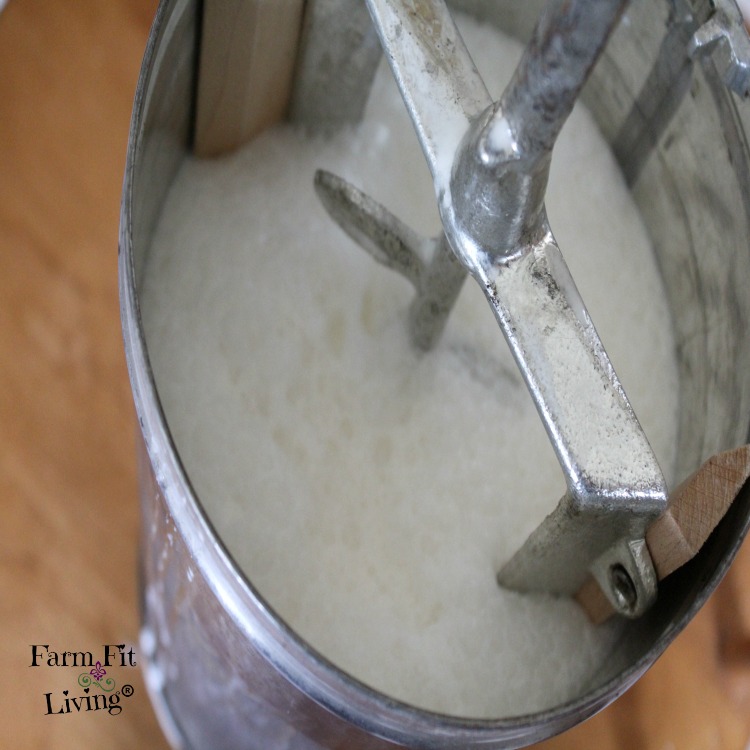
First, stir all the ingredients together into a large bowl. Then, slowly pour the entire mixture into the ice cream machine canister. Close the lid on top tightly.
Then, place the canister into the ice cream maker. Make sure it is firmly settled into the ice cream maker so you can get the crank or electric part on top correctly.
Next, pack around the canister completely with ice and rock salt. First, a layer of ice. Then, top with a layer of rock salt and repeat until full. Finally, start churning the ice cream. When the churn stops moving, the ice cream is set! And it's ready to eat.
Keep in mind that the homemade no-cook ice cream MUST BE cold in order to set. If you walk away and the ice melts, you'll have to start all over because the finished product will be ruined.
Pro Chef Tips
#1 Chill everything beforehand: Keep your mixing bowl and ingredients in the fridge for at least 15 minutes before mixing. Cold tools help the cream churn faster and fluffier, which is key for creamy ice cream.
#2 Don't overmix the ingredients: Overwhipping turns it grainy, and that can mess with your ice cream's silky texture.
#3 Fold gently: When mixing the milk, cream and sugar, don't rush or stir aggressively. A gentle fold keeps the air in, leading to that light, scoopable texture we all want.
#4 Add mix-ins at the end: Stir your extras in after churning keep flavors distinct and prevent things from sinking to the bottom during freezing.
#5 Freeze in a shallow container: Using a wide and shallow container instead of a deep one encourages even freezing, so no icy chunks sneak into your creamy masterpiece.
Storage and Shelf Life Tips
So, you've whipped up your six quarts of pure ice cream bliss-now what? Storing your ice cream right preserves that creamy goodness and keeps your spoons happy for days, weeks, or whenever you're ready for round two. Good storage is like tucking your ice cream into a cozy bed that keeps it fresh and scoopable.
Most Important Things You Should Know
- Use Airtight Containers: Transfer your ice cream to sealable, airtight containers immediately after churning to prevent freezer burn and flavor contamination.
- Minimize Air Exposure: Press wax paper or plastic wrap directly on the ice cream surface before closing the lid to reduce ice crystal formation.
- Freeze at Constant Temperature: Store your ice cream in the coldest, most stable part of the freezer-usually the back-to avoid softening and refreezing cycles that ruin texture.
- Consume Within 1-2 Weeks: For best flavor and texture, try to finish your no-cook homemade batch within two weeks; although safe longer, quality degrades noticeably after.
- Thaw Slightly Before Serving: Let ice cream sit out 5-10 minutes before scooping to soften just enough without melting.
Common Myths
Myth: Ice cream keeps indefinitely in the freezer.
Truth: Over time, ice crystals grow, and flavors fade, making even the best homemade ice cream less enjoyable after weeks.
Myth: Stirring melted ice cream and refreezing fixes texture.
Truth: Refreezing melts ice crystals unevenly, generally worsening texture and causing more iciness.
Myth: Aluminum foil or plastic wrap alone protect ice cream well.
Truth: These materials help but aren't fully airtight; container sealing is essential for best preservation.
Best Growth Hacks for the Best No Cook Vanilla Ice Cream
- Always Store in Individual Portions: Keeps the main batch sealed longer since you open only small containers.
- Label Containers with Date: Helps you track freshness and avoid freezer roulette.
- Keep Your Freezer Alert: Use freezer thermometers to maintain consistent temperatures below 0°F (-18°C).
- Freeze Mix-Ins Separately: Adds texture freshness when sprinkled on top post-scoop.
- Vacuum-Sealed Storage: For longer life, vacuum seal containers or bags to minimize air and frost exposure.
- Use Ice Cream Shields: Place a plastic disk on the surface of ice cream before sealing to block ice crystals.
- Don't Store Near Strong Odors: Ice cream absorbs odors easily; place away from pungent foods.
Mistakes to Avoid
- Storing In Original Manufacturer Freezer Bowls: These aren't airtight, leading to frost build-up and flavor loss.
- Leaving Ice Cream Exposed To Open Air: Causes freezer burn and drying out.
- Frequent Temperature Changes: Opening freezer door often or storing near warm foods causes melting-freezing cycles that crystalize ice cream.
- Using Containers That Are Too Large: Excess air inside speeds up freezer burn.
- Neglecting To Label Dates: Leads to eating stale ice cream accidentally.
- Refreezing Melted Ice Cream: Greatly diminishes taste and texture.
- Storing Ice Cream Near Fridge Door: Warmer temperatures cause softening and unpredictable freezing.
Don't Let The Ice Melt
So, it's easy to do. I've done it. Thinking I could go do other things while the ice cream is churning. Not a good idea, friends.
Because on extremely hot days, the ice will evaporate and melt too quickly. If more ice isn't added, the ice cream will not be cold enough. It won't set.
So, it's very important to watch the ice cream. But, we all know a watched pot never boils. Watched ice cream doesn't set any quicker.
Therefore, you need something to do while you wait. Read a book while you wait. Hoe the flower bed nearby. Just make sure you are right there to add the ice. If you feel you are going to be side tracked, set a timer to remind you to check.
One tip: Tuck a large beach towel completely around the top of the ice cream maker to keep the ice from evaporating too quickly. The dry towel helps the ice cream to stay cold. Cold cream will set up quicker.
Enjoy your delicious homemade no-cook ice cream. After you eat the first scoop, just pop the left over ice cream into the freezer until you're ready for more.
What do you put on ice cream?
Oh, the possibilities. There's the standard chocolate, caramel and strawberry, but some people like to get really creative with their ice cream.
And that is perfectly ok!
Here's 10 other great toppings you can try on your ice cream after it's ready to enjoy:
- Nuts
- Fruit, such as strawberries or blueberries
- Whipped Cream
- Peanut Butter
- Sprinkles (My kids' favorite)
- Oreo
- Mini peanut butter cups
- Marshmellows
- Brownie pieces - My Favorite Brownie Recipe
- Soda Pop, such as Root Beer
Again, there's a million more that you can add to this list. Depending on what you like. One thing I'd like to try is something like fresh mint or jalapeno for that spicy/sweet mix. Hmm...Maybe this summer.
Oh, the possibilities.
Other Flavor Options for homemade ice cream
For chocolate ice cream, you can add in 2 tablespoons of cocoa powder to the mixture. You can also add in:
- chocolate chips
- fresh fruit chunks
- caramel sauce
Common Troubleshooting for No-Cook Ice Cream
We all love the myth of perfect experiments going smoothly. The reality? Sometimes you get icy blobs, rock-hard bricks, or soupy slush. But worry not-no-cook ice cream is forgiving, with fixes in your toolkit that often save the batch or next round. Troubleshooting is basically ice cream therapy.
Most Important Things You Should Know
- Grainy or Icy Texture: Usually caused by insufficient fat, sugar, or improper chilling; fix by adjusting sweetness or adding stabilizers next time.
- Too Hard to Scoop: Possibly too little sugar or frozen for too long; try adding a splash of alcohol or corn syrup in the recipe to soften.
- Soft or Runny Ice Cream: Often from too much liquid fat replacer, over-alcohol, or inadequate freezing; reduce liquid ratios or chill ingredients longer.
- Separated Ingredients or Curds: May result if acidic items are added too early or mixture not well combined; balance acid and add later in churning.
- Machine Not Mixing Properly: Could be overloaded or paddle not set correctly; make smaller batches and check machine assembly before use.
Common Myths when Making Soft Serve Ice Cream
Myth: Icy texture means the recipe is a failure.
Truth: Minor texture issues can be corrected in the next batch by tweaking ingredient ratios and chilling practices.
Myth: Adding more cream fixes all texture issues.
Truth: Too much cream dilutes sweetness and can reduce freezing effectiveness, causing slipperiness.
Myth: Letting ice cream sit outside to "fix" texture is helpful.
Truth: Sitting out softens but repeated temperature swings encourage ice crystal growth.
The best part about this basic recipe is that it is so delicious and refreshing but perfect with any ice cream flavor. You can just make this no cook ice cream recipe your own. It's one of my favorite things about Summertime. Anything is possible, so enjoy the delicious homemade ice cream memories made for a lifetime with homemade no-cook ice cream. What's your favorite way to enjoy homemade no cook ice cream on a hot day?


This sooo yum! I would definitely try this soon!
It's delicious!
This looks amazing and so easy to make!
Greta | http://www.gretahollar.com
It is really good stuff.
That looks delicious! Wish I had an ice cream maker!
Thanks, Jenny! Maybe someone has one you could borrow?
So how well does it freeze? Some homemade ice cream recipes you have to thaw quite awhile (seems like forever!) before being able to eat the leftovers, but some are just a few minutes.
Hey, Val! It freezes great! Still nice and creamy and easy to work with.
I've never made homemade ice cream before. I should really try it this summer.
You should! This recipe is easy. You'll never want store bought again. 🙂